Introduction


toy-rpc aims to be an easy-to-use async RPC tool that is inspired by golang's net/rpc's API.
It supports both async_std and tokio runtimes over either TCP or TLS. Integration with common HTTP server frameworks such as actix_web, warp and tide
are provided.
The overall usage and API should feel similar to that of the golang's net/rpc package. Some of the names are changed
to make them sound more "rusty". Because rust does not come with runtime reflection, attribute macros #[export_impl]
and #[export_trait] / #[export_trait_impl], and attribute #[export_method] are used to mark functions "exported" in golang's
net/rpc perspective.
Minimum supported Rust version: 1.53 or later
Why?
While there are grpc implementations like grpc-rs and tonic as well as schema-free crates like tarpc, I didn't find
a crate that offers the same level of ease-of-use as that of the golang's net/rpc package. Other than the ease-of-use,
not many async RPC crates work with both async_std and tokio runtime and could be difficult to integrate with the common
async HTTP crates (actix_web, warp, and tide). Thus I started working on this crate to bring something that is
easy-to-use and supports both async_std and tokio runtimes.
Feature flags
Most of the feature flags can be put into three categories.
Choice of runtime and HTTP framework integration
async_std_runtime: supports usage withasync-stdtokio_runtime: supports usage withtokiohttp_tide: enablestideintegration on the server side. This also enablesasync_std_runtimeandws_async_stdhttp_actix_web: enablesactix-webintegration on the server side. This also enablestokio_runtimeandws_tokiohttp_warp: enables integration withwarpon the server side. This also enablestokio_runtimeandws_tokiohttp_axum: enables integration withaxumon the server side. This also enablestokio_runtimeandws_tokio
Choice of RPC server or client (both can be enabled at the same time)
server: enables RPC serverclient: enables RPC client. Please note thatwsmust also be enabled for client to usedial_http(addr)ordial_websocket(addr).
Choice of serialization/deserialzation (only one should be enabled at a time)
serde_bincode: (default) the default codec will usebincodefor serialization/deserializationserde_json: the default codec will useserde_jsonforjsonserialization/deserializationserde_cbor: the default codec will useserde_cborfor serialization/deserializationserde_rmp: the default codec will usermp-serdefor serialization/deserialization
WebSocket support (HTTP integration is implemented using WebSocket)
ws_tokio: enables WebSocket and HTTP integrations withtokio. This must be enabled for client to usedial_http(addr)ordial_websocket(addr)withtokio_runtime.ws_async_std: enables WebSocket and HTTP integrations withasync-std. This must be enabled for client to usedial_http(addr)ordial_websocket(addr)withasync_std_runtime.
TLS support
tls: enables TLS support
Convenience conversion to anyhow::Error
anyhow: enables usinganyhow::Errorin RPC methods
Other trivial feature flags are listed below, and they are likely of no actual usage for you.
docsstd:serde/std. There is no actual usage right now.
By default, only serde_bincode feature is enabled.
You must enable at least one runtime feature flag and the server and/or client to have something usable.
Default features
default = [
    "serde_bincode",
]
Quickstart
A simple quickstart with tokio runtime is shown below. More examples can be found in the Example chapter.
Initialize new project
cargo new --lib toy_rpc_quickstart
Add dependencies
[dependencies]
tokio = { version = "1", features = ["rt-multi-thread", "macros", "net"] }
toy-rpc = { version = "0.7.5", features = ["tokio_runtime", "server", "client"] }
Project structure
./src
├── /bin
│   ├── server.rs
│   ├── client.rs
└── lib.rs
In the Cargo.toml, you may need to specify the binaries with
[[bin]]
name = "server"
path = "src/bin/server.rs"

[[bin]]
name = "client"
path = "src/bin/client.rs"
Define RPC service
In src/lib.rs
// src/lib.rs

pub mod rpc {
    use toy_rpc::macros::export_impl;
    pub struct Echo { }

    #[export_impl]
    impl Echo {
        #[export_method]
        pub async fn echo_i32(&self, arg: i32) -> Result<i32, String> {
            Ok(arg)
        }
    }
}
RPC server
In src/bin/server.rs
// src/bin/server.rs

use tokio::{task, net::TcpListener};
use std::sync::Arc;
use toy_rpc::Server;

use toy_rpc_quickstart::rpc::Echo;

#[tokio::main]
async fn main() {
    let addr = "127.0.0.1:23333";

    // Creates an instance of the `Echo` service
    let echo_service = Arc::new(
        Echo { }
    );

    let server = Server::builder()
        .register(echo_service) // register service
        .build();
    let listener = TcpListener::bind(addr).await.unwrap();

    // Run the server in a separate task
    let handle = task::spawn(async move {
        println!("Starting server at {}", &addr);
        server.accept(listener).await.unwrap();
    });
    handle.await.expect("Error running the RPC server");
}
RPC client
In src/bin/client.rs
use toy_rpc::Client;

// import everything including the client stub generated by the macro
use toy_rpc_quickstart::rpc::*;

#[tokio::main]
async fn main() {
    let addr = "127.0.0.1:23333";
    let client = Client::dial(addr).await.unwrap();

    let result: i32 = client
        .echo() // calling service `Echo`
        .echo_i32(3i32) // calling RPC method `echo_i32`
        .await
        .unwrap();
    println!("{:?}", result);

    // The above call is equivalent to
    let result: i32 = client
        .call("Echo.echo_i32", 3i32)
        .await
        .unwrap();
    println!("{:?}", result);
}
Define Service
There are two ways (but three attribute macros) to help you define the the RPC service.
- The attribute macro
#[export_impl]can be used when the implementation and the service definition are located in the same file/project. The name of thestructwill be used as the default service name with#[export_impl]in a case sensitive manner. - The attribute macros
#[export_trait]and#[export_trait_impl]should be used when an abstract service definition (atrait) will be shared among different projects. The name of thetraitwill be used as the default service name with#[export_trait]in a case sensitive manner.
Both #[export_impl] and #[export_trait] will generate the client stub traits/methods when the "client" feature flag is enabled and a runtime feature flag is enabled on toy-rpc.
Inside the impl block or trait definition block, you should then use the attribute
#[export_method] to mark which method(s) should be "exported" as RPC method(s).
The methods to export must meet the following criteria on the server side
- the method resides in an impl block marked with
#[export_impl]or#[export_trait] - the method is marked with
#[export_method]attribute - the method takes one argument other than
&selfand returns aResult<T, E>- the argument must implement trait
serde::Deserialize - the
OktypeTof the result must implement traitserde::Serialize - the
ErrtypeEof the result must implement traitToString
- the argument must implement trait
The method is essentially in the form
#[export_method]
async fn method_name(&self, args: Req) -> Result<Res, ErrorMsg>
where
    Req: serde::Deserialize,
    Res: serde::Serialize,
    ErrorMsg: ToString,
{
    // ...
}
Example Usage
Use the following dependencies to work with the examples below
[dependencies]
async-trait = "0.1.50"
toy-rpc = "0.7.5"
#[export_impl]
When you have both the service definition and the implementation in the same file, you can use #[export_impl] on the impl block. This will also use the name of the struct as the default service name.
File structure
./src
├── /bin
│   ├── server.rs
│   ├── client.rs
└── lib.rs
Suppose that both the service definitions and implementations are placed in src/lib.rs.
// src/lib.rs
use toy_rpc::macros::export_impl;

pub struct Foo { }

#[export_impl] // The default service name will be "Foo"
impl Foo {
    // use attribute `#[export_method]` to mark which method to "export"
    #[export_method]
    async fn exported_method(&self, args: ()) -> Result<String, String> {
        Ok("exported method".into())
    }

    async fn not_exported_method(&self, args: ()) -> Result<String, String> {
        Ok("not exported method".into())
    }
}
You may also define a separate trait in src/lib.rs which is implemented by some struct in the same file.
// continuing in src/lib.rs

use async_trait::async_trait;

#[async_trait]
pub trait Arith {
    async fn add(&self, args: (i32, i32)) -> Result<i32, String>;
    async fn subtract(&self, args: (i32, i32)) -> Result<i32, String>;
}

pub struct Bar { }
// implement the Arith trait for `Bar { }`and then mark the implementation as "exported" for RPC

#[async_trait]
// Place `#[export_impl] ` after `#[async_trait]`
#[export_impl] // The default service name will be "Bar"
impl Arith for Bar {
    // Only mark `add(...)` as RPC method
    #[export_method]
    async fn add(&self, args: (i32, i32)) -> Result<i32, String> {
        Ok(args.0 + args.1)
    }

    // `subtract(...)` will not be accessible from RPC calls
    async fn subtract(&self, args: (i32, i32)) -> Result<i32, String> {
        Ok(args.0 - args.1)
    }
}
We will continue to use this example in the Server and Client chapters.
#[export_trait] and #[export_trait_impl]
When you want the abstract service definition to be shared but without concreate implementations, you should use #[export_trait] on the trait definition and #[export_trait_impl] on the concrete trait implementation. Please note that the default service name hence will be the name of the trait NOT that of the struct.
Suppose we will have three separate crates
"example-service"as the service definition,"example-server"acting as the server,- and
"example-client"acting as the client
which can also be found in the GitHub examples (service, server, client).
We are going to define the RPC service just as a trait in "example-service".
// example-service/src/lib.rs
use async_trait::async_trait;
use toy_rpc::macros::export_trait;

#[async_trait]
#[export_trait] // The default service name will be "Arith"
pub trait Arith {
    // let's mark both `add(...)` and `subtract(...)` as RPC method
    #[export_method]
    async fn add(&self, args: (i32, i32)) -> Result<i32, String>;

    #[export_method]
    async fn subtract(&self, args: (i32, i32)) -> Result<i32, String>;

    // some method that we don't want to export
    fn say_hi(&self);
}
We will continue to use this example in the Server and Client chapters.
If you want to the Client implements the RPC trait and don't care about cancelling the RPC call, the implementation can be conveniently generated with an argument (impl_for_client) in the attribute macro #[export_trait]. The usage will demonstrated below.
#![allow(unused)]
fn main() {
#[async_trait]
#[export_trait(impl_for_client)] // This will generate `Arith` trait implementation for `toy_rpc::Client`
pub trait Arith {
    // let's mark both `add(...)` and `subtract(...)` as RPC method
    #[export_method]
    async fn add(&self, args: (i32, i32)) -> Result<i32, anyhow::Error>;

    #[export_method]
    async fn subtract(&self, args: (i32, i32)) -> Result<i32, toy_rpc::Error>;

    // All methods must be exported if trait implementation generation is enabled
    // fn say_hi(&self);
}
}
This will allow convenient client usage like
#![allow(unused)]
fn main() {
// client.rs

let reply = Arith::add(&client, (3,4)).await.unwrap();
}
More can be found here in the tokio_tcp example
Server
The server API look straightforward and fairly close to that of golang's net/rpc package. First we should choose an async runtime and enable the "server" feature flag in our Cargo.toml file. Here, we will choose the tokio runtime be enabling the "tokio_runtime" feature flag.
[dependencies]
tokio = { version = "1", features = ["rt-multi-thread", "macros", "net"] }
toy-rpc = { version = "0.7.5", features = ["tokio_runtime", "server"] }
The next step is then to build the service instances and register the service instances onto a server which will be demonstrated below.
You can definitely register services that are defined with #[export_impl] and #[export_trait] on the same server. However, for simplicity and consistency with the service definition chapter, in the discussions below, we are going to have separate examples. If you need an example where services defined with #[export_impl] and #[export_trait] are all registered on the same server, please refer to this.
Example with #[export_impl]
Let's just remind ourselves that in this example the service definition and implementation are located in the same file/project, and the file structure is as follows
./src
├── /bin
│   ├── server.rs
│   ├── client.rs
└── lib.rs
Using the service we have defined and implemented in the previous chapter, we are going instantiate those services and register those instances in src/bin/server.rs.
// src/bin/server.rs
use tokio::net::TcpListener;
use std::sync::Arc;
use toy_rpc::Server;

// Suppose the name of this crate is "example"
// Let's import the two services
use example::{Foo, Bar};

#[tokio::main]
async fn main() {
    let addr = "127.0.0.1:23333";
    let foo = Arc::new(Foo { }); // instance of "Foo" service
    let bar = Arc::new(Bar { }); // instance of "Bar" service

    // Register the services onto a server
    let server = Server::builder()
        .register(foo) // register service instance with default name "Foo"
        .register(bar) // register service instance with default name "Bar"
        .build(); // build the server

    // Open a TcpListener for incoming connections
    let listener = TcpListener::bind(addr).await.unwrap();

    // Start our server and accept incoming connections and requests
    server.accept(listener).await.unwrap();
}
Example with #[export_trait] and #[export_trait_impl]
Now we are back with the example with #[export_trait] and #[export_trait_impl], let's just remind ourselves that we have three separate crates where the service is defined in "example-service" and will be implemented in "example-server" as shown below.
We will continue to use the tokio runtime so that we don't need to change our Cargo.toml file, but because we will be implementing the service below, we will need to add async-trait and our service definition crate into our dependencies.
[dependencies]
async-trait = "0.1.50"
tokio = { version = "1", features = ["rt-multi-thread", "macros", "net"] }
toy-rpc = { version = "0.7.5", features = ["tokio_runtime", "server"] }

# our service definition
example-service = { version = "0.1.0", path = "../example-service" }
Now, let's implement the service and start the server
// src/main.rs

use tokio::net::TcpListener;
use std::sync::Arc;
use async_trait::async_trait;
use toy_rpc::Server;
use toy_rpc::macros::export_trait_impl;

// Import our service definition
// Make sure you import everything to include the auto-generated helper
// traits that allow convenient service registration
use example_service::*;

struct Abacus { }

#[async_trait]
#[export_trait_impl] // The default service name will be "Arith"
impl Arith for Abacus {
    // Please note that you do NOT need to mark methods with
    // `#[export_method]` another time

    async fn add(&self, args: (i32, i32)) -> Result<i32, String> {
        Ok(args.0 + args.1)
    }

    async fn subtract(&self, args: (i32, i32)) -> Result<i32, String> {
        Ok(args.0 - args.1)
    }

    fn say_hi(&self) {
        println!("hi");
    }
}

#[tokio::main]
async fn main() {
    let addr = "127.0.0.1:23333";
    let arith = Arc::new(Abacus{}); // create an instance of the `Arith` service
    let listener = TcpListener::bind(addr).await.unwrap();
    let server = Server::builder()
        .register(arith) // register service with default name "Arith"
        .build();

    println!("Starting server at {}", &addr);
    server.accept(listener).await.unwrap()
}
Server with async-std runtime
The overall usage with async-std runtime should look (almost) the same as the examples before. The only difference would be
- add
async_stdto your dependecies - enable feature
"async_std_runtime"as opposed to"tokio_runtime" - use
async_std::net::TcpListenerinstead oftokio::net::TcpListener
If we were to run the server with async-std runtime, our previous #[export_trait] and #[export_trait_impl] example would then look like the code below.
[dependencies]
async-trait = "0.1.50"
async-std = { version = "1.9.0", features = ["attributes"] }
toy-rpc = { version = "0.7.5", features = ["async_std_runtime", "server"] }

# our service definition
example-service = { version = "0.1.0", path = "../example-service" }
// src/main.rs

use async_std::net::TcpListener;
use std::sync::Arc;
use async_trait::async_trait;
use toy_rpc::Server;
use toy_rpc::macros::export_trait_impl;

// Import our service definition
// Make sure you import everything to include the auto-generated helper
// traits that allow convenient service registration
use example_service::*;

struct Abacus { }

#[async_trait]
#[export_trait_impl] // The default service name will be "Arith"
impl Arith for Abacus {
    // Please note that you do NOT need to mark methods with
    // `#[export_method]` another time

    async fn add(&self, args: (i32, i32)) -> Result<i32, String> {
        Ok(args.0 + args.1)
    }

    async fn subtract(&self, args: (i32, i32)) -> Result<i32, String> {
        Ok(args.0 - args.1)
    }

    fn say_hi(&self) {
        println!("hi");
    }
}

#[async_std::main]
async fn main() {
    let addr = "127.0.0.1:23333";
    let arith = Arc::new(Abacus{}); // create an instance of the `Arith` service
    let listener = TcpListener::bind(addr).await.unwrap();
    let server = Server::builder()
        .register(arith) // register service with default name "Arith"
        .build();

    println!("Starting server at {}", &addr);
    server.accept(listener).await.unwrap()
}
Server with tokio runtime
This is just going to be an identical copy of the previous #[export_trait] and #[export_trait_impl] example.
[dependencies]
async-trait = "0.1.50"
tokio = { version = "1", features = ["rt-multi-thread", "macros", "net"] }
toy-rpc = { version = "0.7.5", features = ["tokio_runtime", "server"] }

# our service definition
example-service = { version = "0.1.0", path = "../example-service" }
// src/main.rs

use tokio::net::TcpListener;
use std::sync::Arc;
use async_trait::async_trait;
use toy_rpc::Server;
use toy_rpc::macros::export_trait_impl;

// Import our service definition
// Make sure you import everything to include the auto-generated helper
// traits that allow convenient service registration
use example_service::*;

struct Abacus { }

#[async_trait]
#[export_trait_impl] // The default service name will be "Arith"
impl Arith for Abacus {
    // Please note that you do NOT need to mark methods with
    // `#[export_method]` another time

    async fn add(&self, args: (i32, i32)) -> Result<i32, String> {
        Ok(args.0 + args.1)
    }

    async fn subtract(&self, args: (i32, i32)) -> Result<i32, String> {
        Ok(args.0 - args.1)
    }

    fn say_hi(&self) {
        println!("hi");
    }
}

#[tokio::main]
async fn main() {
    let addr = "127.0.0.1:23333";
    let arith = Arc::new(Abacus{}); // create an instance of the `Arith` service
    let listener = TcpListener::bind(addr).await.unwrap();
    let server = Server::builder()
        .register(arith) // register service with default name "Arith"
        .build();

    println!("Starting server at {}", &addr);
    server.accept(listener).await.unwrap()
}
Integrations with HTTP Server
HTTP integration is accomplished with WebSocket, and (currently) integration with three common rust HTTP server are supported by enabling the corresponding feature flag.
actix-web:"http_actix_web"tide:"http_tide"warp:"http_warp"
HTTP integration with actix-web
The "http_actix_web" feature flag should be toggled on to enable HTTP integration with actix-web. Enabling "http_actix_web" feature flag will also enable the "tokio_runtime" feature flag.
A convenience method Server::handle_http() is available when "http_actix_web" is the only enabled http integration feature flag. If you have multiple http integration feature flags enabled, you can use the Server::scope_config method instead (please note that you should use scope_config without brackets).
We will demonstrate the usage with a new example.
[dependencies]
actix-web = "3.3.2"
toy-rpc = { version = "0.7.5", features = ["http_actix_web", "server"] }
use std::sync::Arc;
use toy_rpc::macros::export_impl;
use toy_rpc::Server;
use actix_web::{web, HttpServer, App};

pub struct Calculator { }

#[export_impl]
impl Calculator {
    #[export_method]
    async fn multiply(&self, args(i32, i32)) -> Result<i32, String> {
        Ok(args.0 * args.1)
    }

    #[export_method]
    async fn divide(&self, args(i32, i32)) -> Result<i32, String> {
        Ok(args.0 / args.1)
    }
}

#[actix_web::main]
async fn main() {
    let addr = "127.0.0.1:23333";
    let calculator = Arc::new(Calculator { });
    let server = Server::builder()
        .register(calculator)
        .build();

    let app_data = web::Data::new(server);

    HttpServer::new(
        move || {
            App::new()
                .service(
                    web::scope("/rpc/")
                        .app_data(app_data.clone())
                        .configure(Server::handle_http()) // equivalent to the line below
                        // .configure(Server::scope_config)
                )
        }
    )
    .bind(addr).unwrap()
    .run()
    .await;
}
HTTP integration with actix-web
The "http_tide" feature flag should be toggled on to enable HTTP integration with tide. Enabling "http_tide" feature flag will also enable the "async_std_runtime" feature flag.
A convenience method Server::handle_http(self) is available when "http_tide" is the only http integration flag that is enabled. If multiple http integration feature flags are enabled, you can use Server::into_endpoint(self) method instead.
We will demonstrate the usage with a new example.
[dependencies]
tide = "0.16.0"
async-std = { version = "1", features = [ "attributes", ] }
toy-rpc = { version = "0.7.5", features = ["http_tide", "server"] }
use std::sync::Arc;
use toy_rpc::macros::export_impl;
use toy_rpc::Server;
use tide::prelude::*;

pub struct Calculator { }

#[export_impl]
impl Calculator {
    #[export_method]
    async fn multiply(&self, args(i32, i32)) -> Result<i32, String> {
        Ok(args.0 * args.1)
    }

    #[export_method]
    async fn divide(&self, args(i32, i32)) -> Result<i32, String> {
        Ok(args.0 / args.1)
    }
}

#[async_std::main]
async fn main() {
    // Get the RPC server ready
    let addr = "127.0.0.1:23333";
    let calculator = Arc::new(Calculator { });
    let server = Server::builder()
        .register(calculator)
        .build();

    // Now we will work with `tide` HTTP server
    let mut app = tide::new();
    app.at("/rpc/").nest(server.handle_http());
    app.listen(addr).await.unwrap();
}
HTTP integration with actix-web
The "http_warp" feature flag should be toggled on to enable HTTP integration with warp crate. Enabling "http_warp" feature flag will also enable the "tokio_runtime" featrue flag.
A convenience method Server::handle_http(self) is available when "http_warp" is the only enabled http integration feature flag. If you have multiple http integration flags enabled, you can use the Server::into_boxed_filter(self) method instead.
We will demonstrate the usage with a new example.
[dependencies]
warp = "0.3.0"
tokio = { version = "1.4.0", features = ["rt-multi-thread", "macros"] }
toy-rpc = { version = "0.7.5", features = ["http_warp", "server"] }
use std::sync::Arc;
use toy_rpc::macros::export_impl;
use toy_rpc::Server;

pub struct Calculator { }

#[export_impl]
impl Calculator {
    #[export_method]
    async fn multiply(&self, args(i32, i32)) -> Result<i32, String> {
        Ok(args.0 * args.1)
    }

    #[export_method]
    async fn divide(&self, args(i32, i32)) -> Result<i32, String> {
        Ok(args.0 / args.1)
    }
}

#[tokio::main]
async fn main() {
    let calculator = Arc::new(Calculator { });
    let server = Server::builder()
        .register(calculator)
        .build();

    // Serve RPC at "ws://127.0.0.1/rpc/"
    // (there is a "_rpc_" appended to the end of the path but the client takes care of that)
    let routes = warp::path("rpc")
        .and(server.handle_http());
    warp::serve(routes).run(([127, 0, 0, 1], 23333)).await;
}
Client
The client side usage should feel fairly close to that of the golang's net/rpc package as well except some changes that makes the client API more rusty and async.
To connect a client to a "raw" TCP server, you should use the dial function; to connect to a HTTP server, you should then use the dial_http function. Once you have a connected client,
you can then use the call_blocking and call methods to access the RPC functions on the server. The #[export_impl] and #[export_trait] attribute macros also generates client stub functions that allows the client to conveniently access the RPC functions without worrying about typing the wrong service or method name.
Connecting to TCP server / HTTP server
For the examples below, we will assume running with the tokio runtime.
[dependencies]
tokio = { version = "1", features = ["rt-multi-thread", "macros"] }
toy-rpc = { version = "0.7.5", features = ["tokio_runtime", "client"] }
The example below shows how to connect to a TCP server
use toy_rpc::Client;

#[tokio::main]
async fn main() {
    let client = Client::dial("127.0.0.1:23333").await
        .expect("Failed to connect to server");
}
Connecting to the HTTP server looks very similar with some minor changes. The example below assumes that we are trying to connect to one of the HTTP servers (all three HTTP integration examples have the RPC server serving at "ws://127.0.0.1:23333/rpc/"). Please note that there is a "rpc" appended to the end of the path by the server integration methods, but this is automatically handled by the Client::dial_http method so you don't need to worry about that.
use toy_rpc::Client;

#[tokio::main]
async fn main() {
    let client = Client::dial_http("ws://127.0.0.1:23333/rpc/").await
        .expect("Failed to connect to server");
}
Accessing RPC services
call_blocking(...) and call(...)
There are two methods available for accessing the RPC services and methods. The call_blocking method blocks the execution until the response is received, and the call method is the asynchronous version where the execution will yield to other tasks scheduled by the runtime while waiting for the response. Cancellation is also supported on the call method, which is discussed with more details in the next chapter.
(Support of timeout is still work-in-progress. The book will be updated once the feature is implemented.)
Generated client stub functions
The generated client stub functions internally uses the call(...) method and are thus async. The client stub functions consist of two steps. The first step is to access your service, and the second step is to access the method defined in that particular service. The method in the first step is always the name of the service but in snake case. For example, if you have a service struct FooBar { }, then the client method you use to access the service will be foo_bar(). The client method you use to access the method is identical to the method definition in the RPC service. For example, if an RPC method is defined as fn add(&self, args(i32, i32)) -> Result<i32, String>;, then the client method you use would be client.bar().add((3i32, 4i32)).await;
Examples
We will continue the #[export_impl] example and the [#[export_trait] and #[export_trait_impl]] example to demonstrate how to access RPC service on the server. The methods you will use to access the RPC service are the same for a TCP connection and a HTTP connection, and for simplicity, all the examples below will assume a TCP connection. For more examples on use with HTTP connections, please checkout the GitHub examples.
#[export_impl]
Let's just remind ourselves that in this example the service definition and implementation are located in the same file/project, and the file structure is as follows
./src
├── /bin
│   ├── server.rs
│   ├── client.rs
└── lib.rs
Since the service is defined and implemented in src/lib.rs from the previous chapter, we are going to include everything in the src/lib.rs file to allow us use the generated client stub functions in our src/bin/client.rs.
use toy_rpc::Client;
use toy_rpc::Error;

// include everything from the lib.rs file
// assuming the name of the crate is "example"
use example::*;

#[tokio::main]
async fn main() {
    let client = Client::dial("127.0.0.1:23333").await
        .expect("Failed to connect to the server");

    // Access the remote `exported_method` method of `Foo` service in a blocking manner
    let result: Result<String, Error> = client.call_blocking("Foo.exported_method", ());
    println!("{:?}", result);

    // Access the remote `add` method of `Bar` service in an asynchronous manner
    let result: Result<i32, Error> = client.call("Bar.add", (3i32, 4i32)).await;
    println!("{:?}", result);

    // You can also use the generated client stub functions
    // Access the remote `exported_method` method of `Foo` service
    // using the generated client stub functions
    let result = client
        .foo() // access `Foo` service
        .exported_method(()) // access `exported_method` of the `Foo` service
        .await;
    println!("{:?}", result);

    // Access the remote `add` method of `Bar` service
    // using the generated client stub functions
    let result = client
        .bar()
        .add((3, 4))
        .await;
    println!("{:?}", result);
}
#[export_trait] and #[export_trait_impl]
Again, let's just remind ourselves that the service in this example is defined in a separate crate example-service and the service is implemented and served by example-server crate. What we will be doing below is to demonstrate the client, which, not surprisingly, look pretty much the same as the example above.
Because the service definition resides in a separate crate, we will need to import that crate as well.
[dependencies]
tokio = { version = "1", features = ["rt-multi-thread", "macros"] }
toy-rpc = { version = "0.7.5", features = ["tokio_runtime", "client"] }

# import our service definition, assuming we have this definition at "../example-service"
example-service = { version = "0.1.0", path = "../example-service" }
use toy_rpc::{Client, Error};

// import everything to use the generated client stub functions
use example_service::*;

#[tokio::main]
async fn main() {
    let client = Client::dial("127.0.0.1:23333").await
        .expect("Failed to connect to the server");

    // Access the remote method `add` of service `Arith` in a blocking manner
    let result: Result<i32, Error> = client.call_blocking("Arith.add", (3i32, 4i32));
    println!("{:?}", result);

    // Access the remote method `subtract` of service `Arith` in an asynchronous manner
    let result: Result<i32, Error> = client.call("Arith.subtract", (9i32, 6i32)).await;
    println!("{:?}", result);

    // Let's use the generated client stub functions
    let result = client
        .arith() // access `Arith` service
        .add((3i32, 4i32)) // access `add` method
        .await;
    println!("{:?}", result);

    let result = client
        .arith() // access `Arith` service
        .subtract((9i32, 6i32)) // access `subtract` method
        .await;
    println!("{:?}", result);
}
Cancellation of RPC call
Cancellation is supported starting from version 0.7.0-alpha.2. The client method call(...) returns a type Call, which can be either .awaited for the response or cancel()ed to stop the execution. When an RPC request is started with the method call(...), the request is sent by a background task whether or not the Call is .awaited. Upon cancel(), the client will send a cancellation request to the server; however, it should be noted that if the client is dropped immediately after calling cancel(), the server may not be able to receive the cancellation request before the connection is dropped by the client.
Below is a simple example showing cancellation on the tokio runtime.In this example, we are going to define a new service with a method that simply runs in loop and sleep for a certain period of time.
File structure:
./src
├── /bin
│   ├── server.rs
│   ├── client.rs
└── lib.rs
Add dependencies:
[dependencies]
tokio = { version = "1", features = ["rt-multi-thread", "macros", "time"] }
toy-rpc = { version = "0.7.5", features = ["tokio_runtime", "server", "client"] }
Service definition and implementation placed in src/lib.rs:
use std::time::Duration;
use toy_rpc::macros::export_impl;
use tokio::time;

struct Example { }

#[export_impl]
impl Example {
    #[export_method]
    async fn finite_loop(&self, args: ()) -> Result<(), String> {
        for counter in 0..500 {
            time::sleep(Duration::from_millis(500)).await;
        }
    }

    #[export_method]
    async fn echo(&self, args: String) -> Result<String, String> {
        Ok(args)
    }
}
Serve the RPC service with src/bin/server.rs
use std::sync::Arc;
use toy_rpc::Server;
use tokio::net::TcpListener;

// assume the name of the crate is "example"
// import service definition and implementation
use example::Example;

#[tokio::main]
async fn main() {
    let addr = "127.0.0.1:23333";
    let ex = Arc::new(Example { });
    let server = Server::builder()
        .register(ex)
        .build()

    let listener = TcpListener::bind(addr).await.unwrap();
    server.accept(listener).await.unwrap();
}
On the client side, let's call the finite_loop RPC function and wait for two seconds and cancel it.
use std::time::Duration;
use tokio::time;
use toy_rpc::client::{Client, Call};

// assume the name of the crate is "example"
// import service definitions and generated client stub functions
use example::*;

#[tokio::main]
async fn main() {
    let client = Client::dial("127.0.0.1:23333").await
        .expect("Failed to connect to server");

    let call: Call<()> = client
        .example() // access `Example` service
        .finite_loop(()); // access `finite_loop` method

    // wait for 2 seconds and cancel
    time::sleep(Duration::from_secs(2)).await;
    call.cancel();
    // You can still .await on a canceled Call, but this will return an error
    let reply = call.await;
    println!("{:?}", reply); // Err(Error::Canceled(Some(id)))

    // the `Call` type can be `.await`ed to wait for the response
    let call = client
        .example() // access `Example` service
        .echo("hello world".to_string()); // access `echo` method
    let result = call.await;
    println!("{:?}", result);
}
Set timeout for an RPC call
A default timeout of 10 seconds is assigned to client upon creation, and this default timeout can be changed using set_default_timeout(duration: Duration) method on the client. Each RPC call will have the default timeout unless it is prepended with set_next_timeout(..) method. The client can set the timeout for the next RPC request using the set_next_timeout(duration: Duration) method, which can be chained with the call method. Please note that the timeout is ONLY set for the immediate next RPC call, and all RPC calls do not have timeout if not explicitly set using the timeout method.
We will re-use the example service definition in the cancellation chapter. For you convenience, the service definition and server code are copied below.
File structure:
./src
├── /bin
│   ├── server.rs
│   ├── client.rs
└── lib.rs
Add dependencies:
[dependencies]
tokio = { version = "1", features = ["rt-multi-thread", "macros", "time"] }
toy-rpc = { version = "0.7.5", features = ["tokio_runtime", "server", "client"] }
Service definition and implementation placed in src/lib.rs:
use std::time::Duration;
use toy_rpc::macros::export_impl;
use tokio::time;

struct Example { }

#[export_impl]
impl Example {
    #[export_method]
    async fn finite_loop(&self, args: ()) -> Result<(), String> {
        for counter in 0..500 {
            time::sleep(Duration::from_millis(500)).await;
        }
    }

    #[export_method]
    async fn echo(&self, args: String) -> Result<String, String> {
        Ok(args)
    }
}
Serve the RPC service with src/bin/server.rs.
use std::sync::Arc;
use toy_rpc::Server;
use tokio::net::TcpListener;

// assume the name of the crate is "example"
// import service definition and implementation
use example::Example;

#[tokio::main]
async fn main() {
    let addr = "127.0.0.1:23333";
    let ex = Arc::new(Example { });
    let server = Server::builder()
        .register(ex)
        .build()

    let listener = TcpListener::bind(addr).await.unwrap();
    server.accept(listener).await.unwrap();
}
On the client side, let's call the finite_loop RPC function with a timeout of three seconds.
use std::time::Duration;
use tokio::time;
use toy_rpc::client::{Client, Call};

// assume the name of the crate is "example"
// import service definitions and generated client stub functions
use example::*;

#[tokio::main]
async fn main() {
    let client = Client::dial("127.0.0.1:23333").await
        .expect("Failed to connect to server");

    let call: Call<()> = client
        .set_next_timeout(Duration::from_secs(3))
        .example() // access `Example` service
        .finite_loop(()); // access `finite_loop` method
    let result = call.await; // This should give you `Err(Error::Timeout)`
}
TLS Support
Support for TLS is implemented with rustls and its async derivatives async-rustls and tokio-rustls.
An example using a self-signed certificate can be found in the GitHub repo.
More detailed documentations are underway.
How to generate self-signed CA and certs (an example)
- Create Root signing key:
openssl genrsa -out ca.key 4096 - Generate self-signed Root certificate:
openssl req -new -x509 -key ca.key -sha256 -subj "/C=CA/ST=BC/L=Vancouver/O=Example, Inc." -days 365 -out ca.cert - Create a key for server:
openssl genrsa -out service.key 4096 - Create a signing request (CSR):
openssl req -new -key service.key -out service.csr -config certificate.conf(see section below for details ofcertificate.conf) - Generate a certificate for the server:
openssl x509 -req -in service.csr -CA ca.cert -CAkey ca.key -CAcreateserial -out service.pem -days 365 -sha256 -extfile certificate.conf -extensions req_ext
certificate.conf
[req]
default_bits = 4096
prompt = no
default_md = sha256
req_extensions = req_ext
distinguished_name = dn
[dn]
C = CA
ST = BC
L = Vancouver
O = Example, Inc.
CN = localhost
[req_ext]
subjectAltName = @alt_names
[alt_names]
DNS.1 = localhost
IP.1 = ::1
IP.2 = 127.0.0.1
PubSub
A simple PubSub support is added in 0.8.0. A simple example can be found here.
A publisher can be created on the server side or the client side using the publisher::<T: Topic>() method, and a subscriber can be created using the subscriber::<T: Topic>(cap: usize) method. They both take one type parameter T which must implement the toy_rpc::pubsub::Topic trait. You can use the provided derive macro #[derive(toy_rpc::macros::Topic)] to define a struct as the pubsub message or by manually implementing the toy_rpc::pubsub::Topic trait on a type.
use toy_rpc::macros::Topic;
use serde::{Serializer, Deserialize};

#[derive(Topic, Serialize, Deserialize)]
pub struct Count(pub u32);
The message item type and topic name can also be customized using attribute #[topic]. For example
#[derive(Serialize, Deserialize, Topic)
#[topic(rename="C")] // This will only change topic name to "C", and the message item type is still `Count`
pub struct Count(u32);
#[derive(Topic)
#[topic(item = "u32")] // This will only change the message item type
pub struct Count { }
#[derive(Topic)
#[topic(rename = "C", item = "u32")] // Or customize both topic name and item type
pub struct Count { }
Or manually implement the Topic trait
#[derive(Serialize, Deserialize)]
pub struct Count(pub u32);

impl toy_rpc::pubsub::Topic for Count {
    type Item = Count; // The Item type must implement `Serialize` and `Deserialize`

    // A String identifier for the topic. The user must ensure it is unique
    fn topic() -> String {
        "Count"
    }
}
A publisher can be created by specifying the topic in the type parameter.
let publisher = client.publisher::<Count>(); // on client side
// let publisher = server.publisher::<Count>(); // on server side
The Publisher implements the futures::Sink<T> trait where T is the type parameter representing the topic. In order to publish message to the topic, the futures::SinkExt trait must be imported.
use futures::SinkExt;

publisher.send(Count(7)).await.unwrap();
A subscriber can be created by specifying the topic in the type parameter and the capacity of its local buffer. Here we will create a subscriber on the client side listening to messages on the topic Count with a local capacity of 10.
let subscriber = client.subscirber::<Count>(10).unwrap(); // on the client side
// let subscriber = server.subscriber::<Count>(10).unwrap(); // on the server side (except for `actix-web`)
The Subscriber implements the futures::Stream<Item = Result<T, toy_rpc::Error>> trait where T is the type parameter representing the topic. In order to process incoming messages, the futures::StreamExt trait must be imported.
use futures::StreamExt;

if let Some(result) = subscriber.next().await {
    let item = result.unwrap(); // There could be errors recving incoming messages
    // do something with the item
}
Example
Ack for Publish message delivery
As of version 0.8.0-beta.0, Ack is added in the cases where explicit Ack is needed. Ack only applies to acknowledge receiving of Publish message and does NOT apply to any RPC requests/responses. There are three different AckMode
AckModeNone, which is the default mode for both theServerandClient. This mode is available on both theServerand theClientUnder this mode, noAckmessage will be required by the publisher or be sent by the subscriber.AckModeAuto. This mode is available on both theServerandClient. Under this mode, both the server and the client will automatically reply with anAckto anyPublishmessage they receive.AckModeManual. This mode is only available onClient. Under this mode, the subscriber needs to manually.ack()in order to get the published item. Please note that under the manual mode, thePublisherbehaves the same as if it is under theAckModeAutomode.
The behavior of publisher/subscriber will be discussed in different senarios below.
-
Publisheron theServerwithAckModeAutoWhen a
Publisheris created on the server side, the server's pubsub handler will wait for ALLAcks from the subscribers, including that fromSubscriberon theServer, in an asynchronous manner, meaning the publisher is able to continue publishing new messages even if some subscribers have not sent backAckyet. Upon reaching the timeout, the server's pubsub handler will try to resend the same publish message (with the same sequence ID) to theSubscribers that have not send backAckmessages. The server will stop retrying after the maximum number of retries is reached.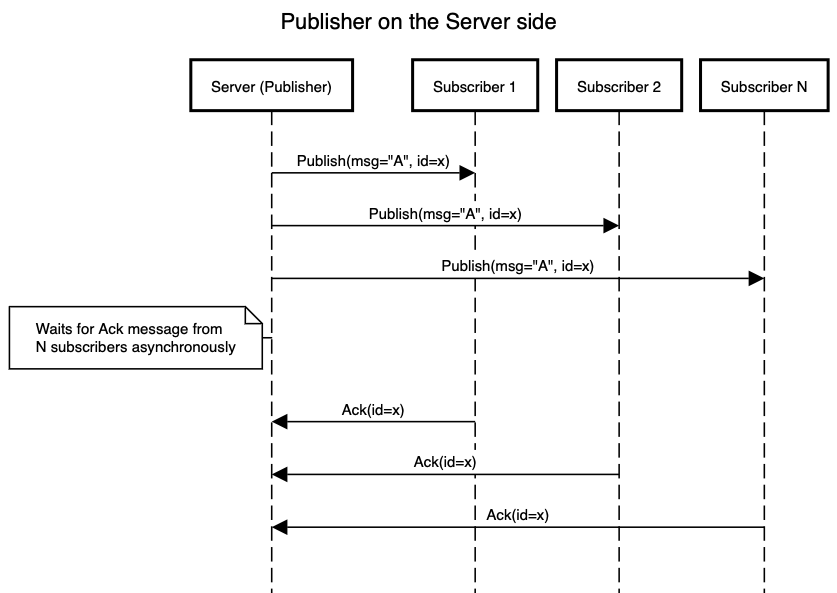
-
Publisheron theClientwithAckModeAutoorAckModeManualWhen a
Publisheris created on the client side, the client will wait for only ONEAckmessage from theServerin an asynchronous manner, meaning thePublisheris able to continue publishing new messages even if theAckmessage from theServerhas not arrived. If theAckmessage from theServerdoes not arrive before the timeout expires, the client will attempt to publish the same message (with the same message ID). The client (Publisher) will stop retrying after the maximum number of retries is reached.Once the
Publishmessage is received by theServer, the message will be assigned a new sequence ID that is tracked only by theServer. The message will then be published to all subscribers under the topic, and the server will wait for ALLAckmessages from the subscribers in an asynchronous manner, meaning the server will be able to keep handling RPC requests or PubSub messages while waiting forAckmessages to come back. If not allAckmessages are sent back to the server before the timeout expires, the server will attempt to resend the same message with the same sequence ID number to the subscribers whoseAckmessages are not received. The server will stop retrying after the maximum number of retries is reached.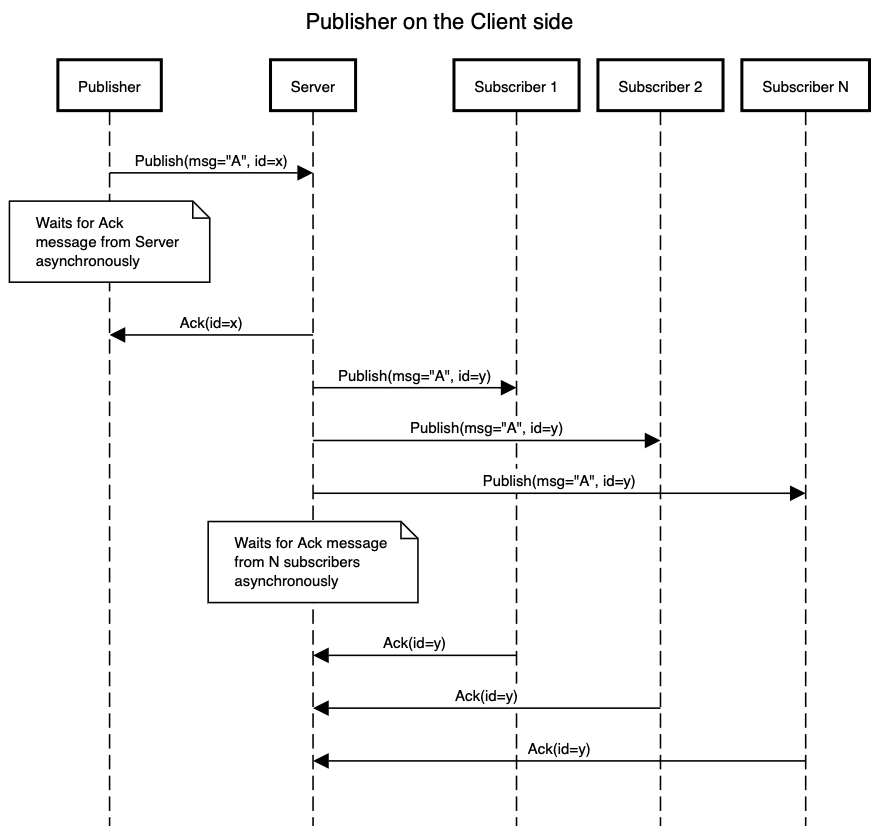
-
Subscriberon theServerside withAckModeAutoPlease note that the
Serverside does NOT supportAckModdManual. Upon receiving a published message, the subscriber will automatically send back anAckmessage to the PubSub handler on the server. -
Subscriberon theClientside withAckModeAutoUpon receiving a published message, the
Clientwill automatically send back anAckmessage back to theServer. -
Subscriberon theClientside withAckModeManualInstead of receiving the usual
Result<Topic::Item, Error>from theSubscriberstream, the user will receiveResult<Delivery<Topic::Item>, Error>. In order to get the usualTopic::Item, the user will need to call.ack()method on theDeliveryobject (ie.let item = delivery.ack()), which will send back anAckmessage to theServer.
How to use AckMode
By default, all Server and Client start with AckModeNone
let server = Server::builder()
    .build(); // This will create a server with `AckModeNone`

let client = Client::dial(ADDR)
    .await.unwrap(); // This will create a client with `AckModeNone`
Ack can be enabled by setting the Server or Client into the corresponding mode using the corresponding builder.
let server = Server::builder() // This will start the builder with `AckModeNone`
    .set_ack_mode_auto() // This will set the ServerBuilder to `AckModeAuto`
    .build(); // This will build the server with `AckModeAuto`

let client = Client::builder()
    .set_ack_mode_auto() // This will set the ClientBuilder to `AckModeAuto`
    .dial(ADDR)
    .await.unwrap(); // This will create a Client with `AckModeAuto`

let client = Client::builder() // This will start the builder with `AckModeNone`
    .set_ack_mode_manual() // This will set the ClientBuilder to `AckModeManual`
    .dial(ADDR)
    .await.unwrap(); // This will create a Client with `AckModeManual`
The timeout and maximum number of retries for the publisher can also be configured
let server = Server::builder()
    // Must enable Ack first
    .set_ack_mode_auto()
    // Sets how long the server will wait for Ack messages.
    //
    // This also affects the Publish messages sent by
    // `Publisher`s from the client side
    .set_publisher_retry_timeout(Duration::from_secs(5))
    // Sets many times the server will retry.
    //
    // This also affects the Publish messages sent by
    // `Publisher`s from the client side
    .set_publisher_max_num_retries(3)
    .build();

let client = Client::builder()
    // Must set the builder into some `Ack` mode
    .set_ack_mode_auto()
    // Sets how long the client publisher will wait for Ack message from Server.
    //
    // This does ***NOT*** affect how long the server will wait for
    // `Ack` from the subscribers
    .set_publisher_retry_timeout(Duration::from_secs(5))
    // Sets how long the client publisher will retry to send the Publish
    // message to the server.
    //
    // This does ***NOT*** affect how many times the server will attempt to
    // resend the publish message to the subscribers
    .set_publisher_max_num_retries(3)
    .dial(ADDR)
    .await.unwrap();
Examples
There are a few examples available on the GitHub repo. Here are some descriptions of those examples.
- "Raw" TCP server and client with
async-stdruntime - "Raw" TCP server and client with
tokioruntime - Cancellation and timeout of RPC call
- Service definition, server implementation, and client implementation in three separate crates
- HTTP integrations
0.9 Preview
Objectives
The planned objectives for 0.9 can be found in this issue.
Summary or the preview releases
More detailed information can be found in the corresponding page.
0.9.0-alpha.1
Relaxed method return type requirements.
0.9.0-alpha.2
Removed AckMode.
0.9.0-alpha.1
Relaxed method return type requirements.
Prior to this release, only Result type is accepted as the return type for
exported methods. Now, for methods that do not really need to be a Result (eg. a simple addition), the return type
no long needs to be wrapped inside a Result. A more detailed example is provided below and can be found in
this example.
Service definition
Please note that the codes that import the crates are intentionally omitted in the example below. Please refer to the example on github for more information.
Service definition with service struct impl
#![allow(unused)]
fn main() {
pub struct Echo { }

#[export_impl]
impl Echo {
    /// This shows an exported method that returns a non-result type
    #[export_method]
    pub async fn echo_i32(&self, req: i32) -> i32 {
        req
    }

    /// This shows an exported method that returns a Result type
    #[export_method]
    pub async fn echo_if_equal_to_one(&self, req: i32) -> Result<i32, i32> {
        match req {
            1 => Ok(req),
            _ => Err(req), // This will present on the client call as `Error::ExecutionError`
        }
    }
}

}
Service definition with a trait
Please note that if impl_for_client is enabled, all the methods in the service trait must return
a Result type.
#![allow(unused)]
fn main() {
/// Here we define a trait `Arith` that comes with default implementations
/// for all of its methods
#[async_trait]
#[export_trait]
pub trait Arith {
    /// Addition
    #[export_method]
    async fn add(&self, args: (i32, i32)) -> i32 {
        args.0 + args.1
    }

    /// Subtraction
    #[export_method]
    async fn subtract(&self, args: (i32, i32)) -> i32 {
        args.0 - args.1
    }

    /// Multiplication
    #[export_method]
    async fn multiply(&self, args: (i32, i32)) -> i32 {
        args.0 * args.1
    }

    /// Division. We cannot divide by zero
    #[export_method]
    async fn divide(&self, args: (i32, i32)) -> Result<i32, String> {
        let (numerator, denominator) = args;
        match denominator {
            0 => return Err("Divide by zero!".to_string()),
            _ => Ok( numerator / denominator )
        }
    }
}

/// Here we are going to define another trait (service) tha is almost
/// identical to `Arith` shown above, but we are going to generate the trait
/// impl for the client using `impl_for_client` argument in our `#[export_trait]`
/// attribute. Plus, we will not going to supply a default implementation either.
#[async_trait]
/// All methods must be exported if client trait impl generation is enabled.
/// If `impl_for_client` is enabled, all methods in the trait must return
/// a Result
#[export_trait(impl_for_client)]
pub trait Arith2 {
    #[export_method]
    async fn add(&self, args: (i32, i32)) -> anyhow::Result<i32>;

    #[export_method]
    async fn subtract(&self, args: (i32, i32)) -> anyhow::Result<i32>;

    #[export_method]
    async fn multiply(&self, args: (i32, i32)) -> anyhow::Result<i32>;

    #[export_method]
    async fn divide(&self, args: (i32, i32)) -> anyhow::Result<i32>;
}
}
Server implementation
Nothing really changed in terms of usage for the server side. The server side example code is attached below for completeness.
struct Abacus { }

/// We will simply use the default implementation provided in the trait
/// definition for all except for add
#[async_trait]
#[export_trait_impl]
impl Arith for Abacus {
    /// We are overriding the default implementation just for
    /// the sake of demo
    async fn add(&self, args: (i32, i32)) -> i32 {
        args.0 + args.1
    }
}

/// For now, you need a separate type for a new service
struct Abacus2 { }

#[async_trait]
#[export_trait_impl]
impl Arith2 for Abacus2 {
    async fn add(&self, args: (i32, i32)) -> anyhow::Result<i32> {
        Ok(args.0 + args.1)
    }

    async fn subtract(&self, args: (i32, i32)) -> anyhow::Result<i32> {
        Ok(args.0 - args.1)
    }

    async fn multiply(&self, args: (i32, i32)) -> anyhow::Result<i32> {
        Ok(args.0 * args.1)
    }

    async fn divide(&self, args: (i32, i32)) -> anyhow::Result<i32> {
        let (numerator, denominator) = args;
        match denominator {
            0 => return Err(anyhow::anyhow!("Divide by zero!")),
            _ => Ok( numerator / denominator )
        }
    }
}

#[tokio::main]
async fn main() {
    env_logger::init();

    let addr = "127.0.0.1:23333";
    let echo_service = Arc::new(
        Echo { }
    );
    let arith = Arc::new(Abacus { });
    let arith2 = Arc::new(Abacus2 { });

    let server = Server::builder()
        .register(echo_service)
        .register(arith)
        .register(arith2)
        .build();

    let listener = TcpListener::bind(addr).await.unwrap();

    log::info!("Starting server at {}", &addr);

    let handle = task::spawn(async move {
        server.accept(listener).await.unwrap();
    });
    handle.await.expect("Error");
}
Client side implementation
Like the server side implementation, there isn't much change to the client side usage. The only thing
worth mentioning is that even if the method doesn't return a Result in the service definition, the client
will still get a Result because there could be errors with connection or serialization/deserialization.
#[tokio::main]
async fn main() {
    let _ = run().await;
}

async fn run() -> anyhow::Result<()> {
    env_logger::init();

    // Establish connection
    let addr = "127.0.0.1:23333";
    let client = Client::dial(addr).await.unwrap();

    // Perform RPC using `call()` method
    let call: Call<i32> = client.call("Echo.echo_i32", 13i32);
    let reply = call.await?;
    println!("{:?}", reply);

    let reply: i32 = client.call("Echo.echo_i32", 1313i32).await?;
    println!("{:?}", reply);

    let ok_result = client
        .echo() // refering to `Echo` service
        .echo_if_equal_to_one(1) // refering to `echo_if_equal_to_one` method
        .await;
    let err_result = client
        .echo()
        .echo_if_equal_to_one(2)
        .await;
    println!("Ok result: {:?}", ok_result);
    println!("Err result: {:?}", err_result);

    // Demo usage with the `Arith` trait
    let addition = client
        .arith() // generated for `Arith` service
        .add((1, 3)).await; // call `add` method
    println!("{:?}", addition);

    // Although the return type of `divide` is a `Result<T, E>`,
    // the execution result will be mapped to `Result<T, toy_rpc::Error>`
    // where `E` is mapped to `toy_rpc::Error::ExecutionError` so that
    //   (1) the Error type doesn't need to implement `Serialize` and
    //   (2) the users don't need to unwrap twice
    let division = client
        .arith()
        .divide((3, 1)).await;
    println!("{:?}", division);

    // let's try to get an execution error
    let divide_by_zero = client
        .arith()
        .divide((3, 0)).await;
    println!("{:?}", divide_by_zero);

    // Now let's take a look at using the generated trait impl for the client.
    let addition = Arith2::add(&client, (7, 8)).await;
    println!("{:?}", addition);

    let division = Arith2::divide(&client, (7, 2)).await;
    println!("{:?}", division);
    let divide_by_zero = Arith2::divide(&client, (7, 0)).await;
    println!("{:?}", divide_by_zero);

    client.close().await;
    Ok(())
}
Removing AckMode
The Ack implementation wasn't particular useful under practical situations as the
client would likely reconnect with a different port and would thus be treated as a
new client.
As the long term goal is to switch to some protocol like AMQP (which is another project that I am currently working on), proper support for message delivery acknowledgement can be expected when that is ready.
Change Log
0.8.4
- Unified all connection related error (read/write) to
Error::IoError(_)
0.8.3
- Reverting back to 2018 edition
0.8.2
- Fixed a bug where attribute macros doesn't parse trait path and type path correctly
0.8.1
- Updated dependencies and corresponding examples
axumto the latest version- WebSocket dependencies like
tungstenite, etc - TLS dependencies like
rustls, etc.
- Switched from
async-rustlstofutures-rustls - The error message of sending on a closed channel upon ending a client or server becomes a debug message now.
0.8.0
- Finalized features
0.8.0-beta
- Added AckMode impl
- Added attribute #[topic()] for derive macro #[derive(Topic)]
- Added integration with
axum
0.8.0-alpha
Breaking Changes
- Communication protocol is changed
Non-breaking Changes
- Added pubsub support
- Added RPC trait implementation generation for client
0.7.4
- Fixed wrong documentation for
Client::with_stream<T>(stream: T)
0.7.3 (yanked)
0.7.2
- Relaxed trait bounds on generic type
TinClient::with_stream<T>(stream: T)
0.7.1
Bug fix
- Fixed a bug where large payload is not written entirely with
tokioruntime
0.7.0
Breaking Changes
- The blocking RPC call on the client side is renamed to
call_blocking - The asynchronous RPC call on the client side is renamed to
call - The
callmethod returns aCall<Res>type whereResrepresents theOktype of result. The request is sent by a background task and thus the newcallmethod is similar to the oldspawn_taskin terms of usage.
New Features
- Cancellation. The
Call<Res>type returned by thecallmethod can be canceled by using thecancel()method. - Timeout. A timeout can be set for the next request by calling
client.timeout(duration). only one request after setting the timeout is going to run with a timeout. If you want to set timeout for multiple requests, you need to set the timeout for each of them.
0.6.1
- Multiple objects of the same types can be registered on the same server again, but you will need to
use the
ServerBuilder::register_with_namemethod as opposed to the regularServerBuilder::register. More details can be found inServerBuilder::register_with_name's documentation.
0.6.0
Breaking Changes
- In short, this update makes the crate resemble closer to the usage of
go'snet/rpcpackage - Service registration is simplified to
Server::builder().register(foo_service).build(). The examples will be updated accordingly. Thusservice!()macro will be deprecatedregisterfunction now takes only one argument, which is the instance of the service- on the client side, the service name will just be the name of the struct. for example,
to call a RPC method on
struct Foo { }service, the client simply uses.async_call("Foo.<method>").awaitwhere<method>should be replaced with the RPC method - you can still register multiple services on the same server. However, only one object of the same type can be registered on the same server. Multiple servers are needed to have multiple objects of the same type.
- Re-defined the custom
Errortype
Non-breaking changes
- Fixed bug where client does not interpret error message correctly
- Fixed bug with
accept_websocketcrashes with incorrect protocol
0.5.4
- Handlers are now stored as a
fnpointer as opposed to a trait object.
0.5.3
- The
#[export_impl]macro now generates client stub functions by generating a new trait fortoy_rpc::Client.
0.5.0
Breaking changes
- HTTP integration is now accomplished using WebSocket with
async_tungstenite, and thus HTTP connections of versions <0.5.0 are not compatible with versions >=0.5.0. - The custom binary transport protocol now includes a magic byte at the beginning, making versions <0.5.0 NOT compatible with versions >= 0.5.0;
toy_rpc::error::Errorchanged from struct-like variants to simple enum variants- Changes to feature flags
- "logging" feature flag is removed
- "surf" feature flag is removed
- "tide" is changed to "http_tide"
- "actix-web" is changed to "http_actix_web"
- added "http_warp" feature flag
- added "async_std_runtime"
- added "tokio_runtime"
Non-breaking changes
- Removed
StreamandSinkimpl from the custom binary transport protocolFrame
0.4.5
- Added
Sinkimplementation for the custom binary transport protocolFrame
0.4.4
- Modified traits
CodecRead,CodecWrite,ServerCodec,ClientCodecto no longer return number of bytes written - The number of bytes written for header and body will be logged separately
0.4.3
- Removed previously unused NoneError
- Unified
call,async_callandspawn_taskfor socket client and HTTP client. Thecall_http,async_call_http, andspawn_task_httpmethods are kept for compatibility.
0.4.2
- Temporary fix of
spawn_task()andspawn_task_http()withArc<Mutex<_>>until lifetime with async task is figured out. As a result,Clientno longer needs to be declaredmut.
0.4.1
- Updated documentation
0.4.0
- Added
actix-webfeature flag to support integration withactix-web
0.3.1
- Added
serde_rmpfeatures flag - Updated and corrected examples in the documentation
0.3.0
- Added
serde_cborfeature flag - Changed
bincodefeature flag toserde_bincode